


What you'll need:
- various feather trim (1-2 yards should be sufficient) --> I used white Ostrich feather and Chinchilla feather trim. I especially like this store for their fumigated washed and impeccably packaged feather trims. I've experimented with cheaper feather trim with less than pretty results. The feathers tend to be held together with sticky adhesives and it rubs off when you're sewing the trim onto fabric. It gets really messy. Consequently, I recommend feathers that are attached to thin cording.
- long sleeve shirt
- sheer white fabric
- scissors
- needle and matching thread
Tips:
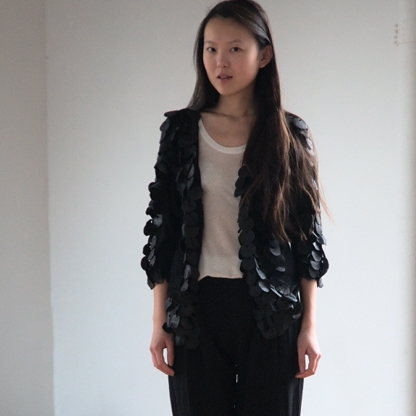
1. There are countless ways to make a shirt like this, but here are some tips on how I went about this DIY so you can get the gist of it. I decided that I wanted several layers of feather trim on the right shoulder for volume and some asymmetry. Sew the chinchilla trim along the right shoulder seam of the shirt and bring it down diagonally across the left chest. Sewing along the seam is a good idea because it serves as an easy guideline and the fabric is stronger here, reducing the risk of ripping and tearing of your shirt.
2. Take your sheer white fabric and start draping. Drape it over the right shoulder so that one half of it drapes around to the back and the other to the front. Trace the edge of the feather trim with the scarf covering where you had sewn. You can get creative here and drape the fabric any way you wish. I draped it so it was covering the left chest.
3. You can add some gathers here and there by pinching off some fabric with your fingers and sewing a knot around it (this is what I did on the upper left of the shirt). Add a few stitches in regions where the fabric feels loose to keep it affixed to the shirt.

4. You'll now have some sheer fabric left hanging in the front. Take this excess material and drape it back to the right side and stitch into place at the right waist.

Now you can add some volume to your shoulder plumage. Take your ostrich trim and cut a few pieces of approximately 1 foot each. Pile the trim on top of the chinchilla trim and sew it down. Add as many layers of trim as you desire.


I hope these photos were helpful in visualizing and thinking out the steps. Perhaps video posts may be a possible option in the future, too. Anyway, for anyone who's considered DIYs in the past and haven't gone for it yet, I really encourage it. If there's anything I've learned from my silly projects it's that don't let lack of experience, confidence and knowledge get you down. You can always learn. Mistakes are your best friends.
Giveaway for this shirt in the entry above!
 Like on Facebook
 Share on Twitter
 Permalink
totally agree. i used the AA scarf in my case because i had it sitting around and it wasn't being used anyway. so i sliced and diced it. muahaha!
(IN)DECOROUS TASTE
Love how the sheer scarf drapes on the top with the feathers too<3
thesoundoflace@blogspot.com
xoxo from Brazil,
Shirley Stamou
www.garotasmodernas.com
http://angysteroom.blogspot.com